MSI Megabook S271: a Look at AMD's Turion X2
by Jarred Walton on October 16, 2006 12:05 AM EST- Posted in
- Laptops
Internals and Construction
We mentioned that the system we originally received was essentially the base model, and since we really wanted to look at Turion X2 performance potential we had to perform some upgrades. That gave us a chance to tear open the system and see how it was put together.
One of the first major issues we have with the design becomes immediately apparent when you decide to make even the simplest upgrade. The vast majority of laptops include a small access panel on the bottom of the system that allows you to upgrade memory. Unfortunately, other than the battery latch and some ventilation, there really isn't much to see on the bottom of the laptop. If you want to add memory, you will have to pop the hood, and as with most laptops this requires removing several screws -- six to be exact. As is typical of most laptops, you will need a small Phillips head screwdriver in order to accomplish this.
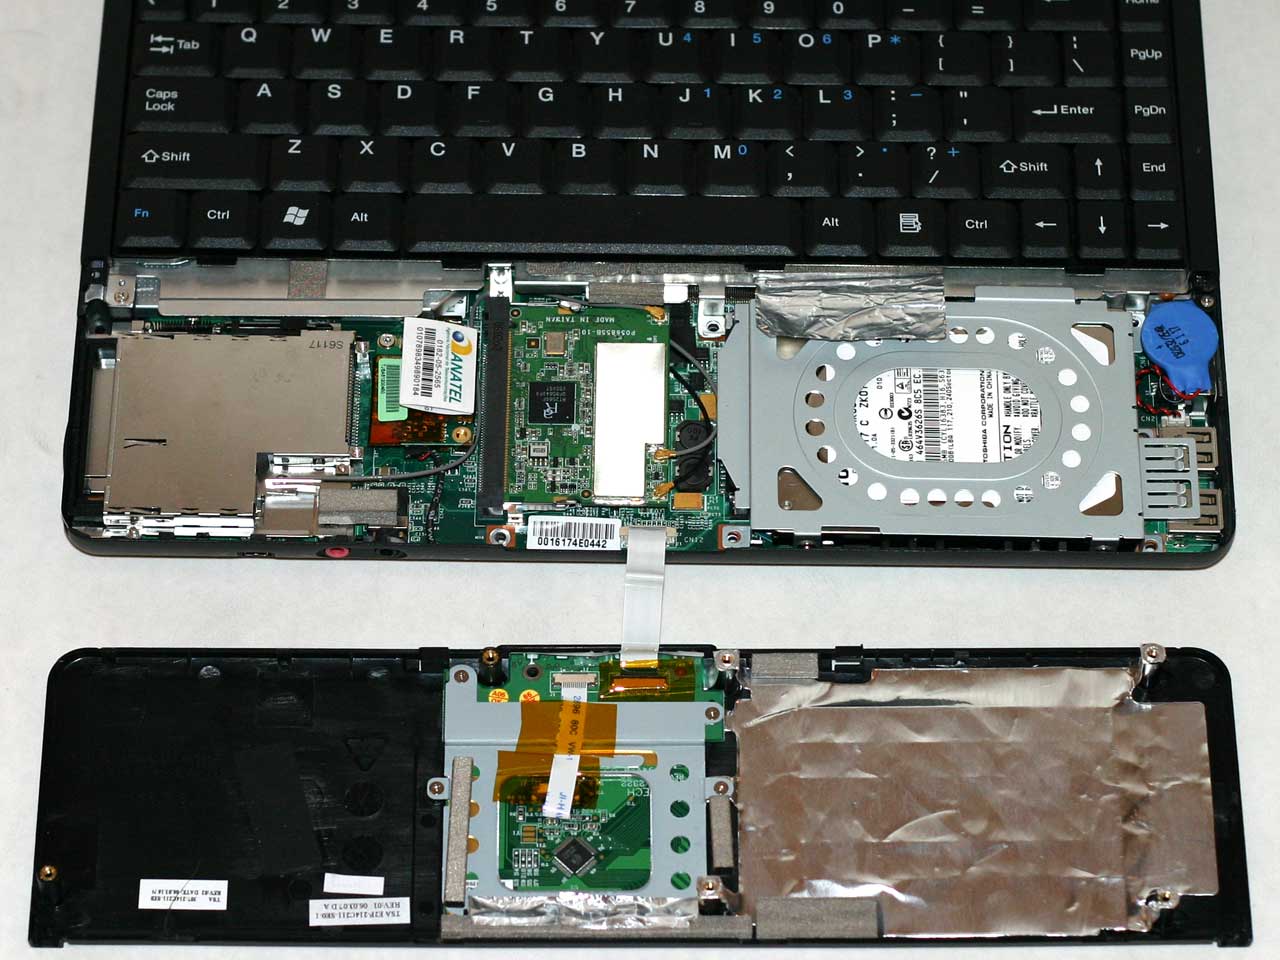
With the screws on the bottom removed, you should be able to use your fingers to pry open the front of the case. We found it was easiest to start at the left front corner, and then work your way around to the front right corner. Once this is done, you can carefully lift off the front plastic panel which includes the trackpad.
This piece is connected to the rest of the system by a ribbon cable, so be careful not to lift/pull it too far until you detach the cable. If you are working on a flat surface, you don't actually need to detach the ribbon cable, which is one less step to worry about if all you're trying to do is upgrade memory or hard drive.
At this point, you can lift the keyboard up, exposing access to the memory slots. The keyboard is also attached by a ribbon cable, and if you don't need to do more than swap/add memory you should be able to do this without detaching the cable. Just be careful not to pull on the ribbon cable too much, as they can be damaged. We removed the cable and keyboard completely in order to get a good shot of the memory slots, which are covered by a thin sheet of foil/insulator. In the above picture, we have two Corsair 1GB SO-DIMMs installed. If you wanted to upgrade your hard drive, one more screw secures the drive bay, and once you remove that you can lift the drive out.
Getting down to the CPU requires a bit more work. First you have to remove the large plastic and aluminum panel. This is secured by one more screw on the bottom rear of the chassis and seven screws on the top of the panel. You also need to remove the hard drive in order to remove this panel. Once you have all the screws removed, you have to pry up the plastic sides in a manner similar to how you first open the case, and then slide the panel up and out. It takes a bit of effort, but if you find that any portions of the panel seem to be stuck check again and make sure you have removed all of the necessary screws.
With that panel out of the way, you can see the relatively large heatsink, heatpipe, and fan assembly that cools the processor, chipset, and some of the voltage regulators. There are actually only four screws holding the heatsink in place, all in the top left portion in a rectangular arrangement. The screws won't actually come all the way out as they are connected to the heatsink, so all you have to do is loosen them and then carefully lift/pry off the cooling assembly.
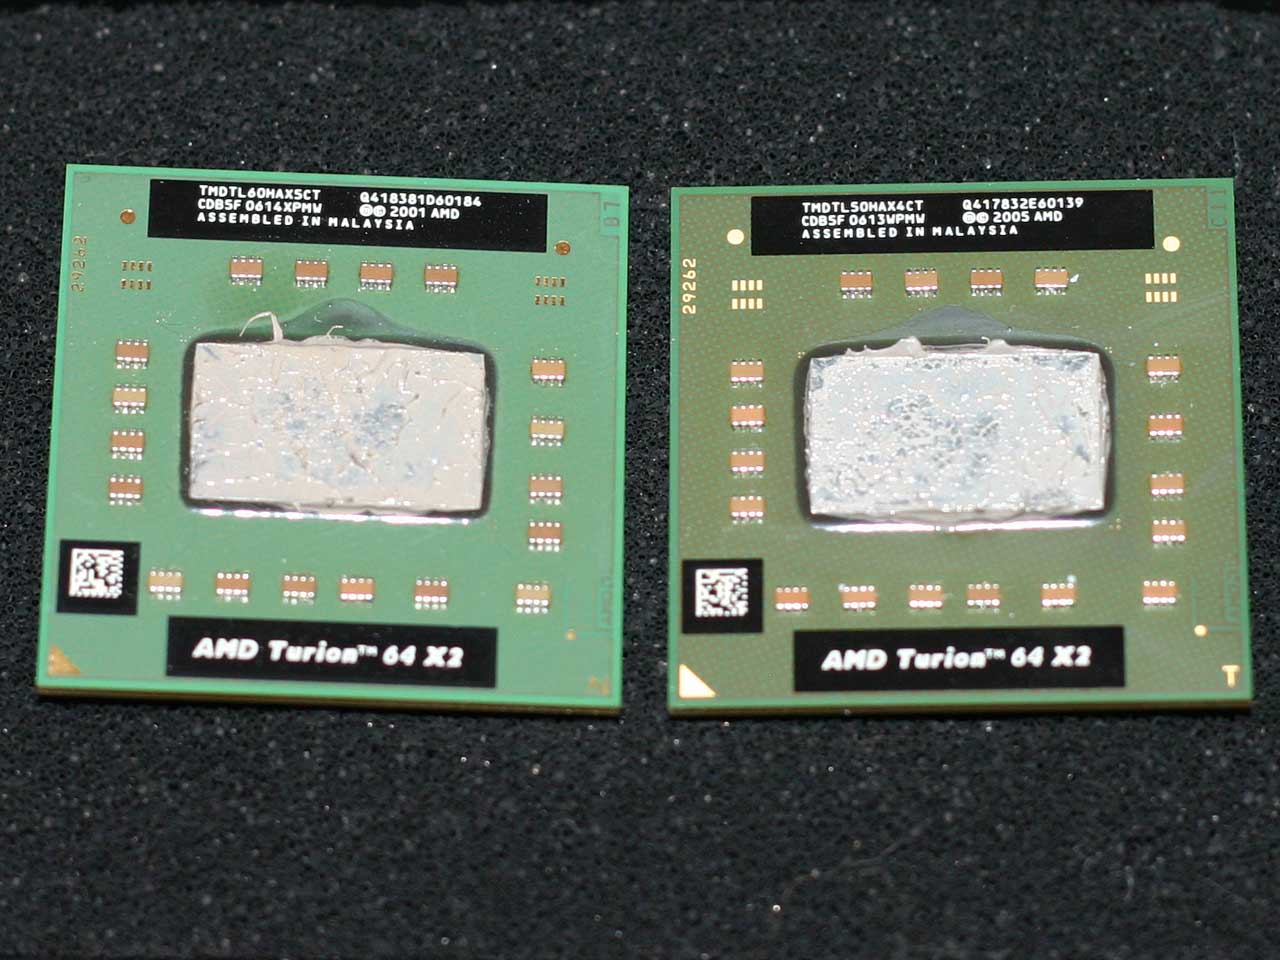
When you got all that done, it's pretty easy to remove the old processor and install a new processor. We did have to scrape off the old thermal pad before installing the new processor, as it had become hard and would likely have caused issues with cooling the processor. We used some inexpensive thermal paste when we installed the TL-60 (and later when switching back to the TL-50), and in subsequent testing we didn't notice any substantial difference in temperatures or stability. Once you've installed the new processor, reverse the whole process to put the system back together and you're done.
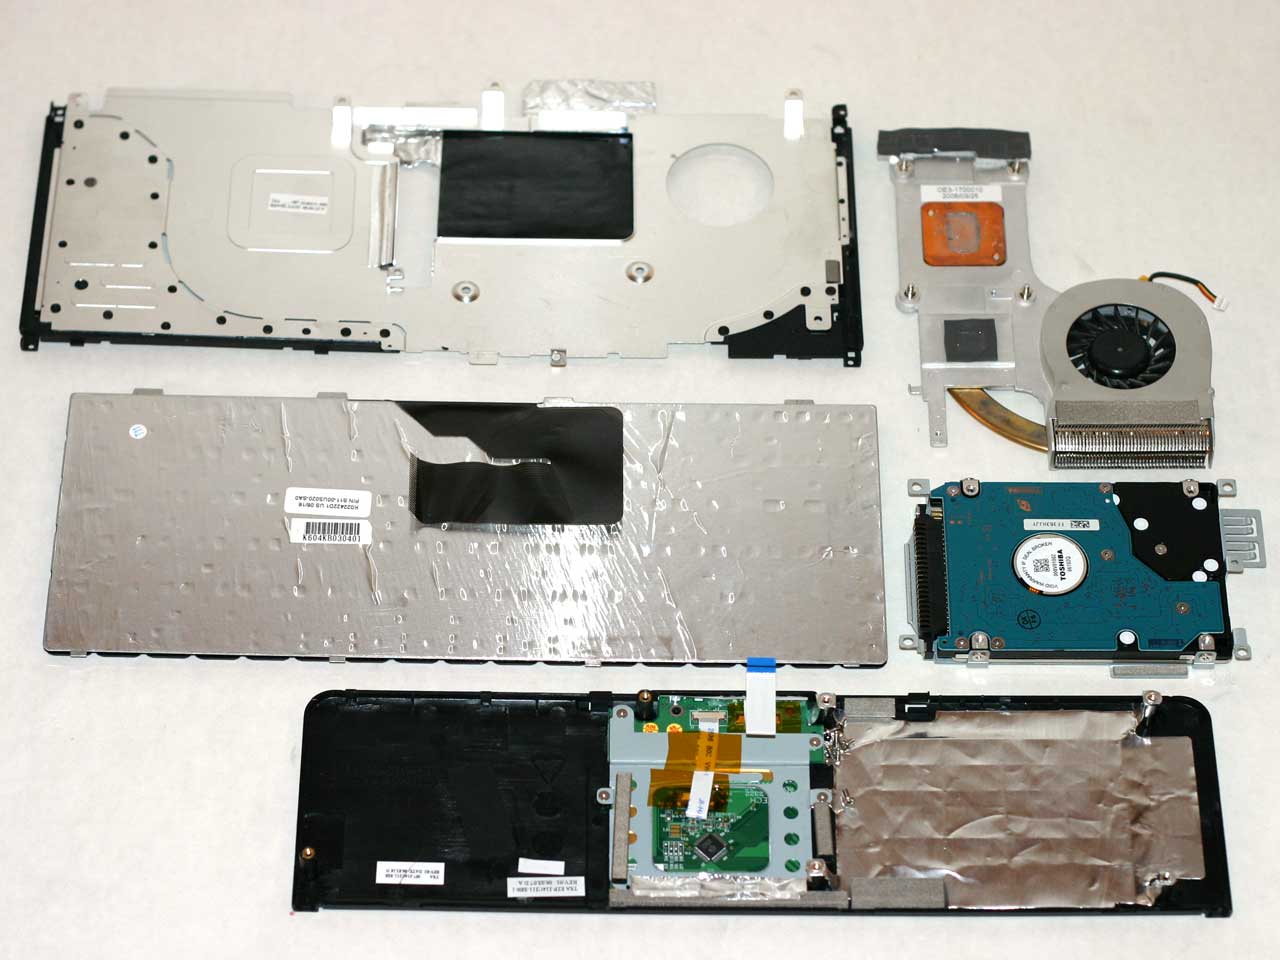
Here's a quick shot of all the pieces you will have won the system is completely disassembled. This is a picture of the bottom of all these components, since we already had various images of the tops. All told, the disassembly and upgrade process was one of the more inconvenient laptops we've dealt with, but as most people will only have to do this once or twice during their ownership of the laptop it shouldn't present too big a problem. However, given that we were testing several different configurations and had to disassemble and reassemble the system quite a few times, we grew to be none too fond of the overall design.
Besides the requirement that you take apart the front of the system just to swap memory, we encountered some problems with the wireless mini-PCI card, likely caused by our poking around inside the case. When the laptop first arrived, the wireless networking worked fine (once we got the proper drivers installed). After our first "upgrade", Windows wireless networking could no longer find our network. After a lot of trial and error, we determined that we must have bumped the card or wires in some fashion that affected the ability for the card to receive signals. We checked the connections and everything looked fine, but the WiFi networking still refused to work. We opened up the laptop again and played around with the card and the connections a bit more, turned the system back on, and the wireless network was back.
Unfortunately, it seemed every time we opened the case there was a good chance that the wireless network would fail, and eventually we reached the point where we were unable to get the wireless adapter to function anymore. Windows didn't indicate any problems other than the inability to see any networks, so most likely it was simply some point of failure in the WiFi antenna that runs throughout the chassis or on the card itself. We have used other laptops that also include bottom panel access to the mini-PCI slot, and it certainly seems that there are better locations than MSI chose, although it is also possible that we just got a flaky wireless networking card in our review unit. Our overall impression of the RALINK wireless networking card is lackluster at best, and we also discovered at one point when the card was working that the latest drivers had a severe memory leak. Thankfully, you don't have to use the RALINK networking application.
We mentioned that the system we originally received was essentially the base model, and since we really wanted to look at Turion X2 performance potential we had to perform some upgrades. That gave us a chance to tear open the system and see how it was put together.
One of the first major issues we have with the design becomes immediately apparent when you decide to make even the simplest upgrade. The vast majority of laptops include a small access panel on the bottom of the system that allows you to upgrade memory. Unfortunately, other than the battery latch and some ventilation, there really isn't much to see on the bottom of the laptop. If you want to add memory, you will have to pop the hood, and as with most laptops this requires removing several screws -- six to be exact. As is typical of most laptops, you will need a small Phillips head screwdriver in order to accomplish this.
 |
| Click to enlarge |
With the screws on the bottom removed, you should be able to use your fingers to pry open the front of the case. We found it was easiest to start at the left front corner, and then work your way around to the front right corner. Once this is done, you can carefully lift off the front plastic panel which includes the trackpad.
 |
| Click to enlarge |
This piece is connected to the rest of the system by a ribbon cable, so be careful not to lift/pull it too far until you detach the cable. If you are working on a flat surface, you don't actually need to detach the ribbon cable, which is one less step to worry about if all you're trying to do is upgrade memory or hard drive.
 |
| Click to enlarge |
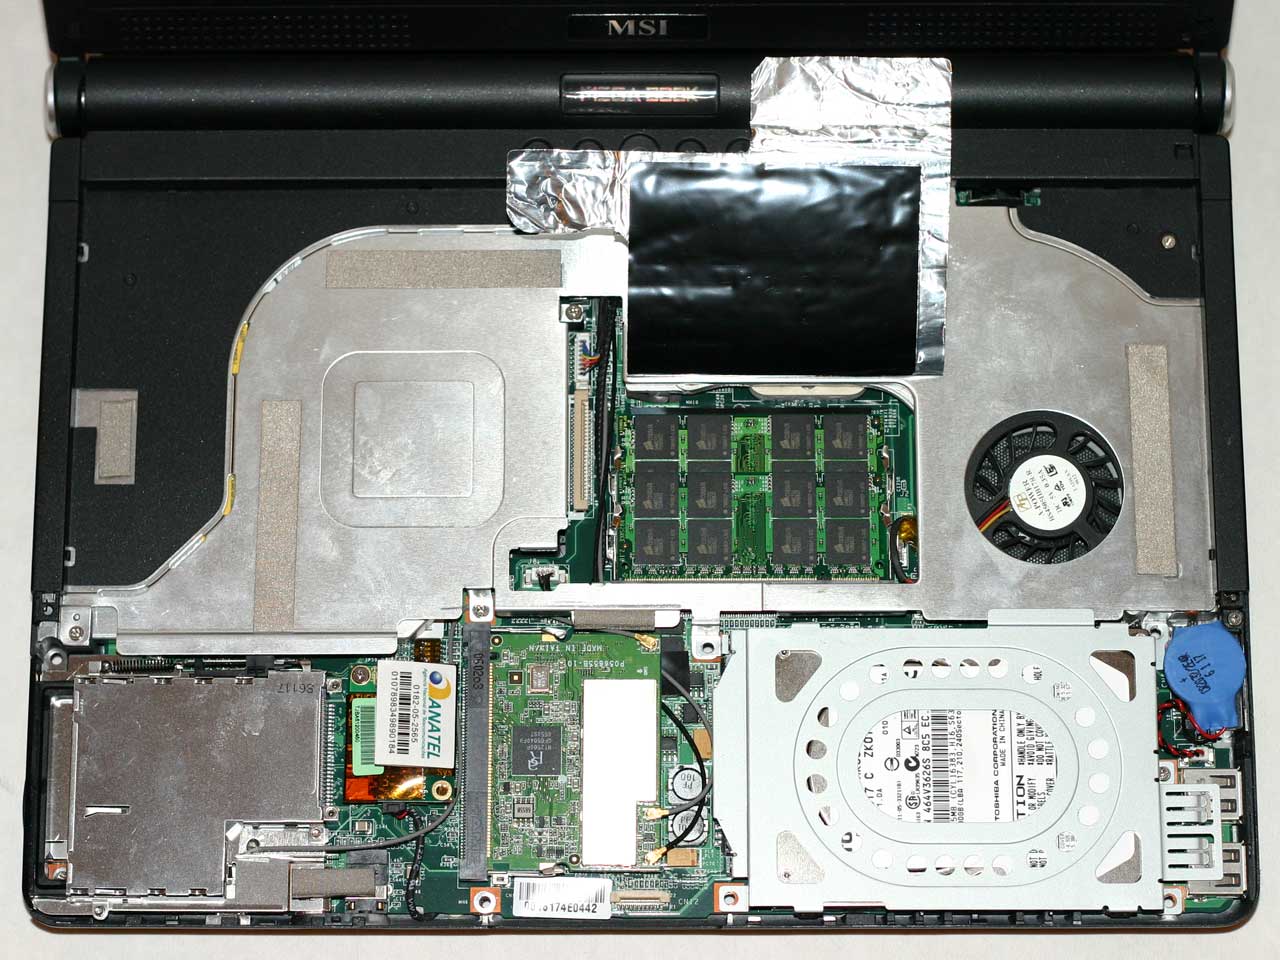
At this point, you can lift the keyboard up, exposing access to the memory slots. The keyboard is also attached by a ribbon cable, and if you don't need to do more than swap/add memory you should be able to do this without detaching the cable. Just be careful not to pull on the ribbon cable too much, as they can be damaged. We removed the cable and keyboard completely in order to get a good shot of the memory slots, which are covered by a thin sheet of foil/insulator. In the above picture, we have two Corsair 1GB SO-DIMMs installed. If you wanted to upgrade your hard drive, one more screw secures the drive bay, and once you remove that you can lift the drive out.
 |
| Click to enlarge |
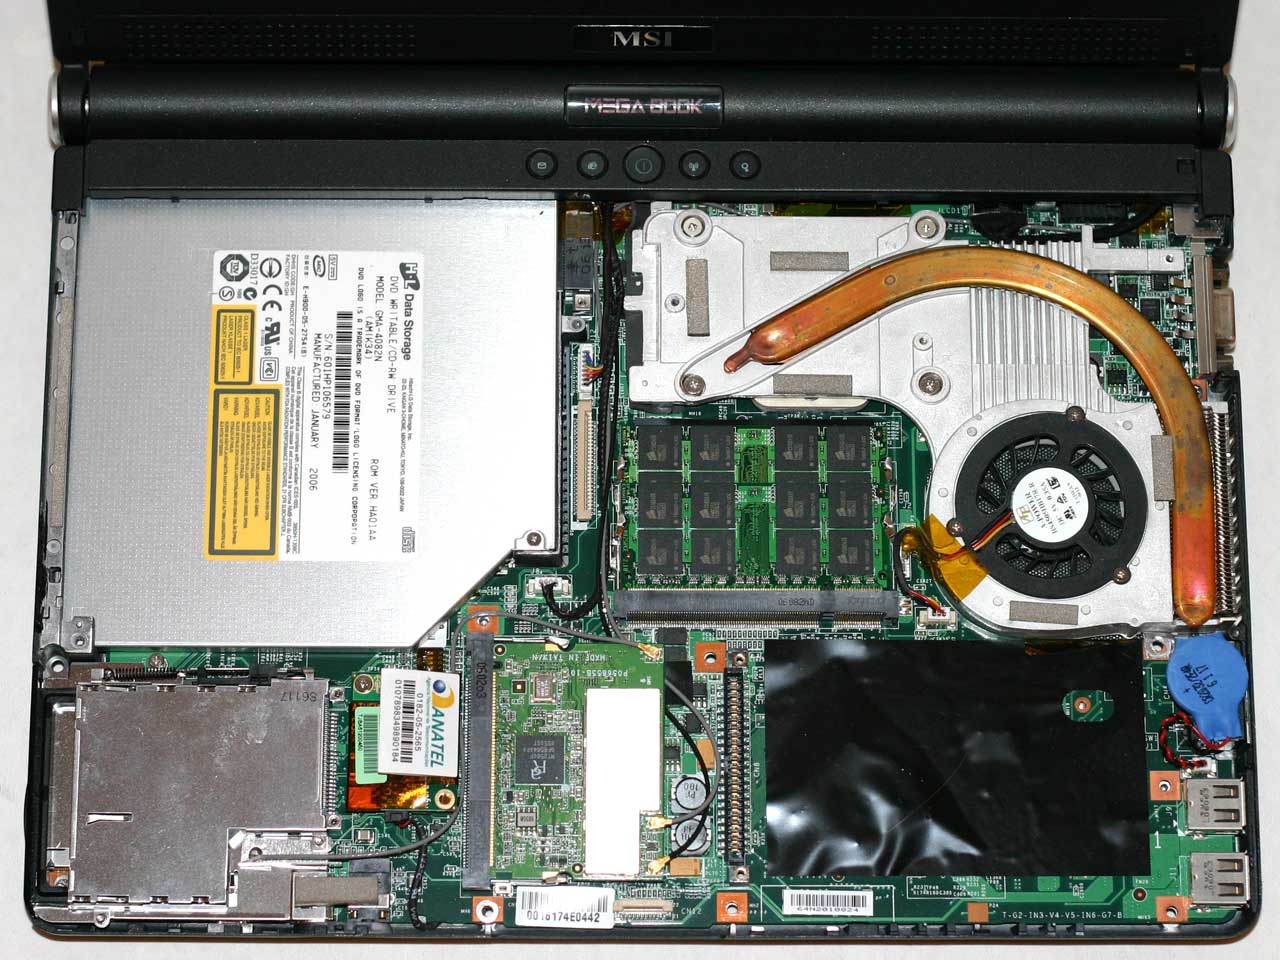
Getting down to the CPU requires a bit more work. First you have to remove the large plastic and aluminum panel. This is secured by one more screw on the bottom rear of the chassis and seven screws on the top of the panel. You also need to remove the hard drive in order to remove this panel. Once you have all the screws removed, you have to pry up the plastic sides in a manner similar to how you first open the case, and then slide the panel up and out. It takes a bit of effort, but if you find that any portions of the panel seem to be stuck check again and make sure you have removed all of the necessary screws.
 |
| Click to enlarge |
With that panel out of the way, you can see the relatively large heatsink, heatpipe, and fan assembly that cools the processor, chipset, and some of the voltage regulators. There are actually only four screws holding the heatsink in place, all in the top left portion in a rectangular arrangement. The screws won't actually come all the way out as they are connected to the heatsink, so all you have to do is loosen them and then carefully lift/pry off the cooling assembly.
 |
| Click to enlarge |
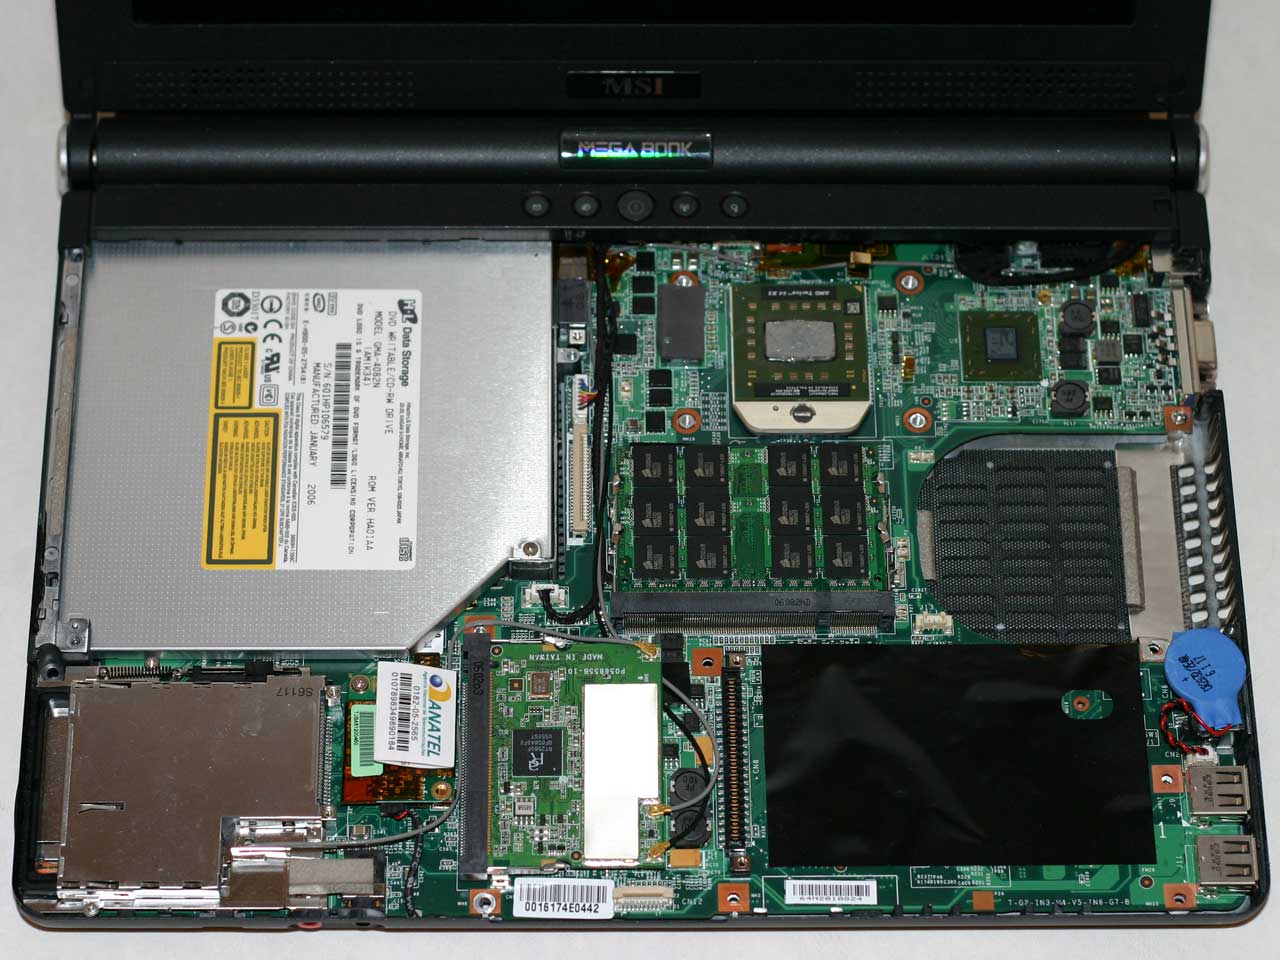
When you got all that done, it's pretty easy to remove the old processor and install a new processor. We did have to scrape off the old thermal pad before installing the new processor, as it had become hard and would likely have caused issues with cooling the processor. We used some inexpensive thermal paste when we installed the TL-60 (and later when switching back to the TL-50), and in subsequent testing we didn't notice any substantial difference in temperatures or stability. Once you've installed the new processor, reverse the whole process to put the system back together and you're done.
 |
| Click to enlarge |
Here's a quick shot of all the pieces you will have won the system is completely disassembled. This is a picture of the bottom of all these components, since we already had various images of the tops. All told, the disassembly and upgrade process was one of the more inconvenient laptops we've dealt with, but as most people will only have to do this once or twice during their ownership of the laptop it shouldn't present too big a problem. However, given that we were testing several different configurations and had to disassemble and reassemble the system quite a few times, we grew to be none too fond of the overall design.
Besides the requirement that you take apart the front of the system just to swap memory, we encountered some problems with the wireless mini-PCI card, likely caused by our poking around inside the case. When the laptop first arrived, the wireless networking worked fine (once we got the proper drivers installed). After our first "upgrade", Windows wireless networking could no longer find our network. After a lot of trial and error, we determined that we must have bumped the card or wires in some fashion that affected the ability for the card to receive signals. We checked the connections and everything looked fine, but the WiFi networking still refused to work. We opened up the laptop again and played around with the card and the connections a bit more, turned the system back on, and the wireless network was back.
Unfortunately, it seemed every time we opened the case there was a good chance that the wireless network would fail, and eventually we reached the point where we were unable to get the wireless adapter to function anymore. Windows didn't indicate any problems other than the inability to see any networks, so most likely it was simply some point of failure in the WiFi antenna that runs throughout the chassis or on the card itself. We have used other laptops that also include bottom panel access to the mini-PCI slot, and it certainly seems that there are better locations than MSI chose, although it is also possible that we just got a flaky wireless networking card in our review unit. Our overall impression of the RALINK wireless networking card is lackluster at best, and we also discovered at one point when the card was working that the latest drivers had a severe memory leak. Thankfully, you don't have to use the RALINK networking application.


31 Comments
View All Comments
JarredWalton - Tuesday, October 17, 2006 - link
I don't have it any more, but it was a 1.66 GHz Core Duo with 512MB RAM and IGP and an 80GB 5400 RPM HDD I believe. So at that speed it was still using aroung 18-19W at idle with minimum display brightness. I'm trying to get the owner of that laptop to run some power tests for me (our old Kristopher Kubicki has one now).