
Original Link: https://www.anandtech.com/show/6088/azza-genesis-9000-case-review-building-it-every-way
AZZA Genesis 9000 Case Review: Building It Every Way
by Dustin Sklavos on July 13, 2012 4:15 AM EST- Posted in
- Cases/Cooling/PSUs
- ATX
- AZZA
AZZA is a relatively new company when it comes to enclosures. Their major splash came with the Fusion 4000 enclosure (which we're still slated to review at some point in the future), a case that can house both a full ATX system and a secondary Mini-ITX system simultaneously. Someone over at AZZA is definitely thinking outside the box, and that becomes increasingly evident when we take a look at their most recent launch, the Genesis 9000.
The Genesis 9000 is an incredibly flexible enclosure, not in terms of building materials (which are almost entirely SECC steel) but in terms of assembly. This is a case that looks incredibly daunting to build in (partly because it's 36 pounds on its own) because of how many ways you can actually build a system in it. More than that, AZZA has gone slightly off the beaten path with the cooling system. The result is a very unique case at a remarkably competitive price, and after multiple nights of testing, we're only too happy to share our conclusions with you.
.jpg)
Saying AZZA is relatively new isn't wholly accurate; they're new to the end user, but they've been building enclosures and power supplies for OEMs like XION for some time now. The hardware that's been released in America under the AZZA label has been distinctive, though, and it's extremely gratifying to see newer Taiwanese companies like AZZA and Bitfenix carving out their own niches with designs that go beyond the basic "gamer" boxes. The Genesis 9000 is one of those designs.
| AZZA Genesis 9000 Specifications | ||
| Motherboard Form Factor | Mini-ITX, Micro ATX, ATX, E-ATX, XL-ATX | |
| Drive Bays | External | 9x 5.25” |
| Internal | 5x 2.5"/3.5" (drive sleds housed inside 5.25" bays) | |
| Cooling | Front | - |
| Rear | 1x 120mm exhaust fan | |
| Top | 2x 230mm exhaust fans | |
| Side | 2x 120mm intake fans and 1x200mm fan mount, 2x 120mm fan mounts on opposite panel | |
| Bottom | 2x 140mm intake fans with space for up to 3x230mm fans | |
| Expansion Slots | 9 | |
| I/O Port | 2x USB 3.0, 2x USB 2.0, eSATA, 1x Headphone, 1x Mic | |
| Power Supply Size | Standard ATX | |
| Clearances | HSF | 200 mm |
| PSU | 2x 240 mm | |
| GPU | 15.7" / 400mm | |
| Dimensions |
25.1" x 9.8" x 23.2" 640mm x 250mm x 590mm |
|
| Weight | 36 lbs / 16.33kg | |
| Special Features |
USB 3.0 connectivity via internal headers Removable, rotatable motherboard tray Dual power supply bays Integrated fan/LED controller Support for 480mm radiator in top of enclosure and 240mm radiator in bottom |
|
| Price | $169 | |
Honestly, for $169 you get a hell of a lot of case. The Genesis 9000 sports a healthy number of ports in the I/O cluster, nine expansion slots, and uses its array of 5.25" bays as a means for supporting 3.5" and 2.5" drives. The drive trays feel like a bit of wasted space, but they're made of solid steel and two of them even have hot-swap backplates that also include 3-pin fan headers. In a pinch you can easily buy an aftermarket 5.25"-to-2x2.5" adaptor as well.
That's before you get to the pair of power supply bays, army of internal fans, LED enclosure lighting, and fan controller. And a removable motherboard tray! There's a lot to dig into here, so let's get started.
In and Around the AZZA Genesis 9000
Big cases draw a lot of attention and even can draw some consternation due to their sheer size, and I can see how the styling of the AZZA Genesis 9000 may not be for everyone. As far as gaudy enthusiast cases go I actually don't mind the Genesis 9000 as much, and users not bullish on the white-and-blue motif can pick up a black-and-red version for the same price.
Looking at the front of the case, you can immediately pick up on two things. First, the front of the case is almost entirely 5.25" bays, reminiscent of Cooler Master's Stacker line. That means that there are no front intake fans on the Genesis 9000, which is unusual in a modern enclosure. There's also a bottom vent held in place by plastic and thumbscrews, but behind that is actually one of the power supply bays complete with a cable that routes to the back of the enclosure. The blue plastic accents aren't just for show, either; when the fan controller's "high" setting is enabled, they actually glow.
.jpg)
The sides of the Genesis 9000 are just as revealing. The two side panels are interchangeable, with the windowed panel tinted blue. It also includes two 120mm intake fans powered by 4-pin molex connectors and a 200mm fan mount. The less ostentatious side panel just includes two 120mm fan mounts. What AZZA got right that cases like Lian Li's PC-A55 didn't was the ventilation in the bottom: there are venting holes along the sides of the bottom of the case to allow the bottom intake fans to do their jobs.
The top of the case hides two 230mm exhaust fans under slanted vents as well as housing the fan controller, I/O cluster, power and reset buttons, and fan speed/LED toggle. You can also remove the top panel via the thumbscrews, but it's still largely held in place by virtue of having to disconnect all the fans and headers that come plugged in by default. Still, you can do it, and that's how you can install a massive radiator to the top of the case. The blue strips up top also illuminate when the "high" fan speed is enabled.
.jpg)
When you get to the back of the case, you can see the handle for the removable, rotatable motherboard tray held in place with six thumbscrews along with the routed power cable for a front-mounted power supply. There's also a removable bracket for a rear-mounted power supply, but when we open up the Genesis 9000 you'll see that space is occupied by one of the two ducted 140mm intake fans.
.jpg)
By default the Genesis 9000's motherboard tray is actually mounted in an inverted configuration as opposed to the standard ATX style, and the internal cabling is very neatly tied to the back of the tray. You can also see the removable support bar for extra heavy video cards. What's changed for the Genesis 9000 since the last era of removable motherboard trays, though, is that we now route cables behind the tray for cleaner internals. That means that if you need to rotate the tray, you're going to need to do all the routing you've already done.
AZZA also includes ducts above the included 140mm fans for both directing air and reducing noise, and these easily snap on and off of the fans. You should also pay close attention to just how much space there is in the bottom for installing newer, more powerful fans. Theoretically you could set up quite a little wind tunnel inside the Genesis 9000, or alternatively a healthy amount of watercooling. Note, too, that the front power supply bay (which is admittedly preferable for most installations) can also house two 3.5" drives.
What we have, essentially, is an extraordinarily flexible enclosure design the likes of which I haven't seen since NZXT's Switch 810. NZXT sells the Switch 810 for $169, but the AZZA Genesis 9000 is in many ways a more high quality enclosure with even more flexibility for the same price; I'm surprised to see a vendor try to undercut NZXT. You'll see the Genesis 9000 also offers solid performance, but we'll get there soon enough.
Assembling the AZZA Genesis 9000
Actually building a system in the AZZA Genesis 9000 is actually a bit daunting, due both to the weight of the enclosure and to the staggering amount of customization that can be done with it. Realistically if you just leave the motherboard tray in and build your system without actually playing with the Genesis 9000, it's not any more difficult than any other enclosure. It's going to be pretty hard to resist doing that, though.
Taking the motherboard tray out doesn't just involve removing the six thumbscrews in the rear; you also have to unwrap the cable ties behind the tray. The tray is on a pair of rails, and those rails are mirrored on the other side of the enclosure. Take it out, and you'll have to screw in some of the motherboard standoffs yourself; the Genesis 9000 only comes with the Mini-ITX ones installed by default. The back of the tray also flexes some, but that's to be expected and is actually more useful than a mark of poor build quality. Getting our testbed motherboard in was easy enough, and AZZA included the necessary mounting holes for a high end Micro-ATX board, holes which have actually been lacking in some of the other cases we've reviewed recently.
Installing our video card was also made much easier by the flex of the back of the tray. Aligning the I/O brackets with the screwholes in the back of a case can actually be difficult, but this is ameliorated by the give in the Genesis 9000's tray and lining up our GeForce GTX 560 Ti proved to be much simpler as a result.
.jpg)
Installing drives in the Genesis 9000 is for the most part just as easy, but it bears mentioning that the Corsair Link kit we ordinarily use for testing couldn't be installed; the steel drive trays used for mounting 2.5" and 3.5" drives bottom-mount them, and the Corsair Link box has no bottom-mount holes. These trays are sturdy as all getout, though, and they line 2.5" and 3.5" drives alike with the two hot-swap backplanes that come preinstalled. Those backplanes are also removable and can be placed behind any of the 5.25" drive bays, and you can buy more from AZZA. The trays themselves have rounded bumps in the front to make them easier to grip, too, and the 5.25" drive bay shields pop out just by pinching the sides. While mounting drives to the trays isn't toolless, virtually everything else is, and the toolless clasps are in place on both sides of the drive cage as opposed to just one (as is typical of most modern cases). The result is a very secure, very flexible mounting system.
Getting the power supply in is only slightly more difficult. You need to snap the fan duct off of the centermost bottom intake fan to slide it into the front bay, but the real trouble lies in the front cover. There are two thumbscrews which hold it in place, but the plastic snaps are too thick and snug, and as a result I actually damaged one trying to remove the front cover. That's not a huge deal since the thumbscrews do most of the work, but it's worth mentioning.
.jpg)
Maybe the biggest problem the Genesis 9000 has is cabling, and that's due to the front-to-back instead of lateral orientation of the drive bays. AZZA has done their best to simplify this, but routing data and power cables for drives behind the motherboard tray is a little less sensible in this case. Everything else routes fine for the most part, although it seems AZZA intended the motherboard tray to be used in the "inverted" default orientation instead of the standard ATX orientation due to where the top I/O cables are routed internally and the placement of the connectors on the hot-swap backplanes. Getting the rest of the cables in is basically child's play, though, if a bit messy due to the sheer number of cables coming off of the I/O cluster in the top of the case. Note that their fan controller has six 3-pin connectors in it, all occupied and all powered by a single 4-pin molex connector.
.jpg)
I appreciate that for the most part AZZA went whole hog with 4-pin molex instead of just using it a little bit here and there. If you're doing a minimal drive installation, you can actually get away with just not using SATA power leads from the power supply; it's a little more archaic, sure, but I prefer to use as few cables from the modular power supply as possible.
Honestly the AZZA Genesis 9000 is an intimidating piece of work due almost entirely to just how much you can do with it, the scope of which unfortunately can't be explored in this review. Build quality is pretty stellar, although I feel like the finish needs just a little more attention; the white plastic and white painted steel don't quite match up in tone, although going with black would probably fix that. The drive trays are incredibly sturdy, though, and the case seems to have been designed to take a bit of a beating. I can get behind that. If you're prone to tinkering endlessly your interest has probably already been piqued, but we still have test results to get to.
Testing Methodology
For testing Micro-ATX and full ATX cases, we use the following standardized testbed in stock and overclocked configurations to get a feel for how well the case handles heat and noise.
| ATX Test Configuration | |
| CPU |
Intel Core i7-2700K (95W TDP, tested at stock speed and overclocked to 4.3GHz @ 1.38V) |
| Motherboard | Gigabyte GA-Z68MX-UD2H-B3 |
| Graphics Card |
ASUS GeForce GTX 560 Ti DCII TOP (tested at stock speed and overclocked to 1GHz/overvolted to 1.13V) |
| Memory | 2x2GB Crucial Ballistix Smart Tracer DDR3-1600 |
| Drives |
Kingston SSDNow V+ 100 64GB SSD Samsung 5.25" BD-ROM/DVDRW Drive |
| Accessories | Corsair Link |
| CPU Cooler | Cooler Master Hyper 212 Evo with Cooler Master ThermalFusion 400 |
| Power Supply | SilverStone Strider Plus 750W 80 Plus Silver |
Each case is tested in a stock configuration and an overclocked configuration that generates substantially more heat (and thus may produce more noise). The system is powered on and left idle for fifteen minutes, the thermal and acoustic results recorded, and then stressed by running seven threads in Prime95 (in-place large FFTs) on the CPU and OC Scanner (maximum load) on the GPU. At the end of fiteen minutes, thermal and acoustic results are recorded. This is done for the stock settings and for the overclock, and if the enclosure has a fan controller, these tests are repeated for each setting. Ambient temperature is also measured after the fifteen idle minutes but before the stress test and used to calculate the final reported results.
Thank You!
Before moving on, we'd like to thank the following vendors for providing us with the hardware used in our testbed.
- Thank you to Puget Systems for providing us with the Intel Core i7-2700K.
- Thank you to Gigabyte for providing us with the GA-Z68MX-UD2H-B3 motherboard.
- Thank you to Crucial for providing us with the Ballistix Smart Tracer memory.
- Thank you to Corsair for providing us with the Corsair Link kit.
- Thank you to Cooler Master for providing us with the Hyper 212 Evo heatsink and fan unit.
- Thank you to Kingston for providing us with the SSDNow V+ 100 SSD.
- Thank you to CyberPower for providing us with the Samsung BD-ROM/DVD+/-RW drive.
- And thank you to SilverStone for providing us with the power supply.
Noise and Thermal Testing, Stock
Since the AZZA Genesis 9000 has no front intake fans, intake cooling duties are handled largely by the two bottom-mounted 140mm fans. Bottom-to-top cooling can be very effective, but the motherboard isn't rotated ninety degrees here the way it is in SilverStone's more efficient designs, so air travelling through the Genesis 9000 unfortunately just doesn't have a very efficient default path to work with.
I tested the Genesis 9000 in its stock tray orientation (with the motherboard tray flipped and the video card above the CPU) and with the tray oriented in the typical ATX style (with the CPU above the video card); these are listed as "default" and "alt" respectively. The case's fan control also only has two speeds, low and high, and so I tested it in each of these speeds for a combined four different test runs. Ambient temperature around the Genesis 9000 varied between 24C and 25C during testing.
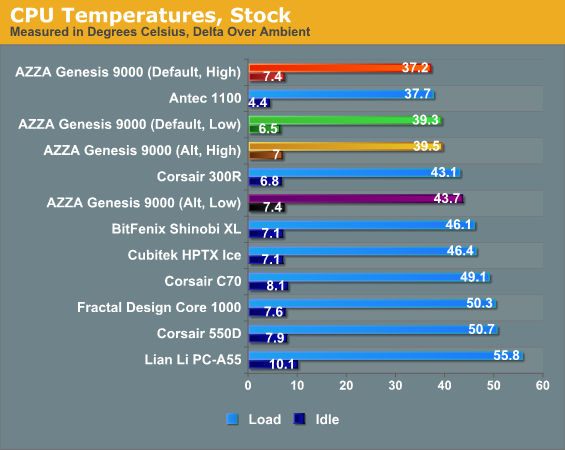
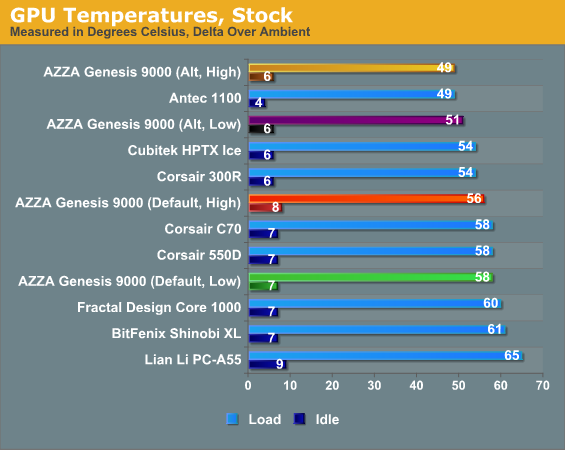
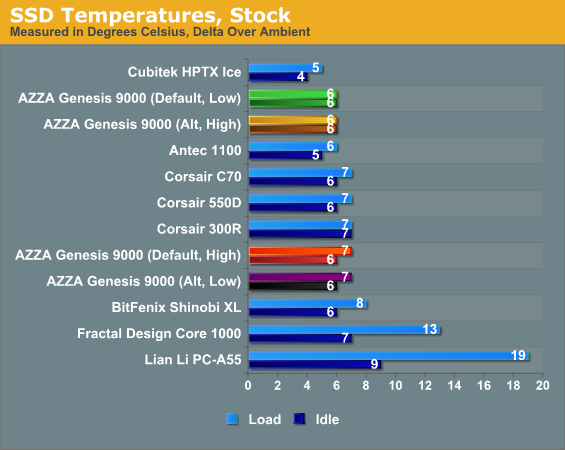
Thermally the Genesis 9000 puts in a solid performance. Unfortunately there's no one-size-fits-all orientation; if you run it in its stock configuration, the graphics card runs hotter but the CPU heatsink gets fed. If you flip the tray, suddenly the graphics card is getting fed but the CPU heatsink is blocked somewhat by the video card. In our non-overclocked configuration, though, we can easily determine that switching between low nad high fan speeds doesn't seem to have much of an effect. This isn't surprising; most cases tend to perform perfectly fine with their fans running low-to-mid speeds and gain very little by pumping up the fan speed.
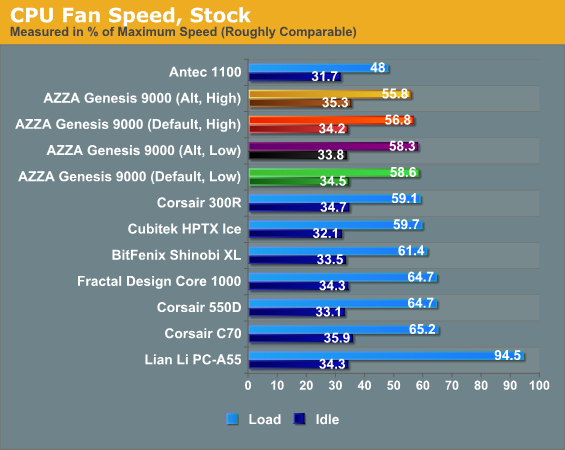
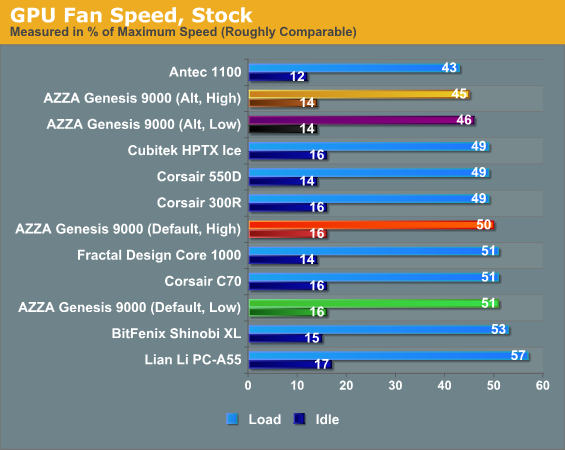
Fan speeds for the most part tell the same story. Depending on the motherboard orientation, you're really feeding one or the other, and I can see this becoming a real problem in a multi-GPU configuration. Under those circumstances you may want to consider installing a 200mm intake fan in the side panel.
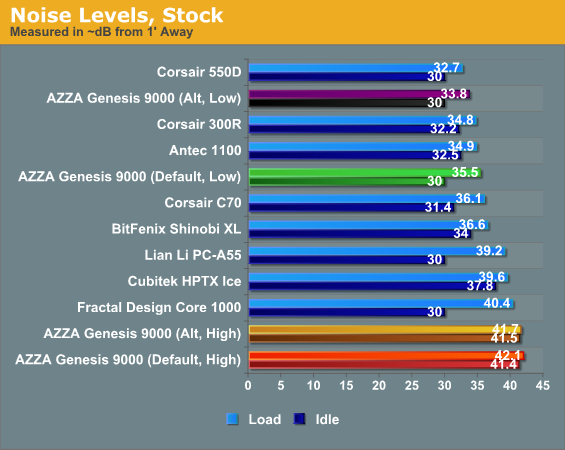
While bumping up the case's fan speed doesn't seem to do much for its thermals, it makes the whole thing nearly unbearable to listen to. There's virtually no reason to run the Genesis 9000 at high speed.
Also note that the standard ATX orientation of the motherboard (listed as "alt") runs a bit quieter. This makes sense when you consider that high performance graphics cards typically draw more power and generate more heat than CPUs do. We're looking at a 95W CPU competing with a 170W GPU; under the circumstances cooling the GPU should probably take priority, and that's why the default orientation may not actually be the right call.
Noise and Thermal Testing, Overclocked
Performance of the AZZA Genesis 9000 in our stock configuration is actually pretty good if not outright stellar, but the case has room to grow, too. It will be interesting to see how well it performs in our overclocked configuration, when we dump voltage into both the GPU and CPU and crank up their clocks.
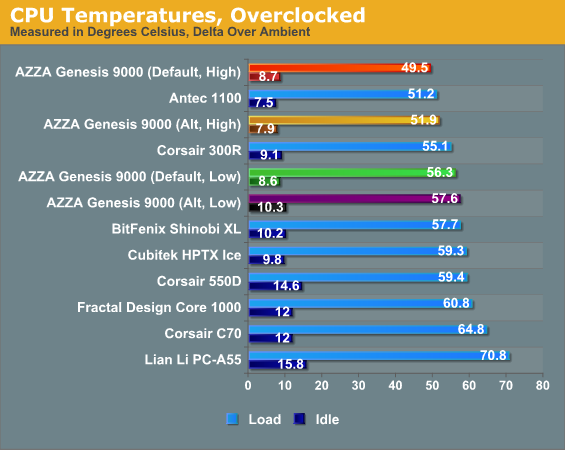
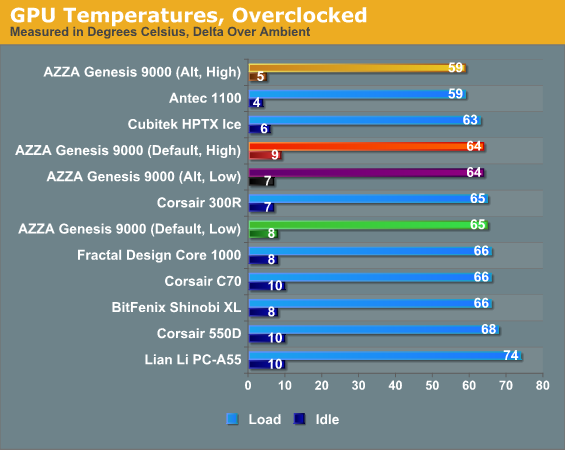
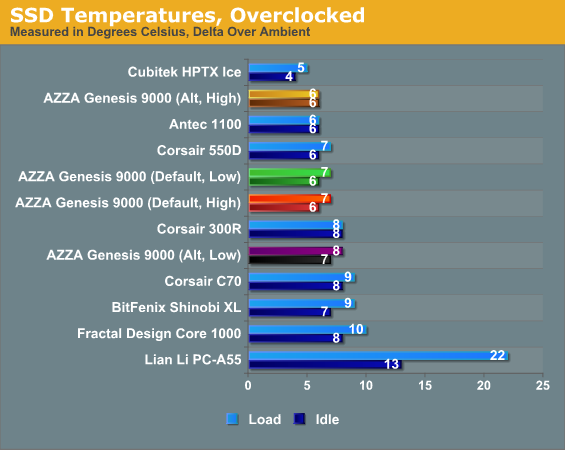
The AZZA Genesis 9000 definitely loses a little ground when we move to our overclocked configuration, but it's still a fairly strong performer. On these charts it's important to recognize that it seems to be competing largely with itself; remove all of the results but the worst in the CPU test results, and the Genesis 9000 is only slightly behind the Antec Eleven Hundred and Corsair Carbide 300R.
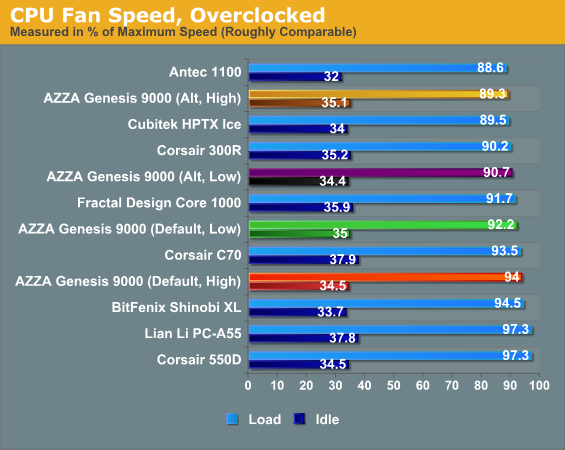
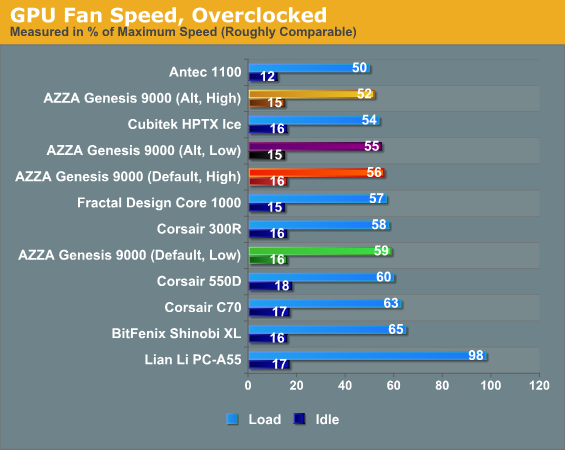
Fan speeds remain competitive and the AZZA Genesis 9000 definitely has room to grow. There's performance still to eke out here.
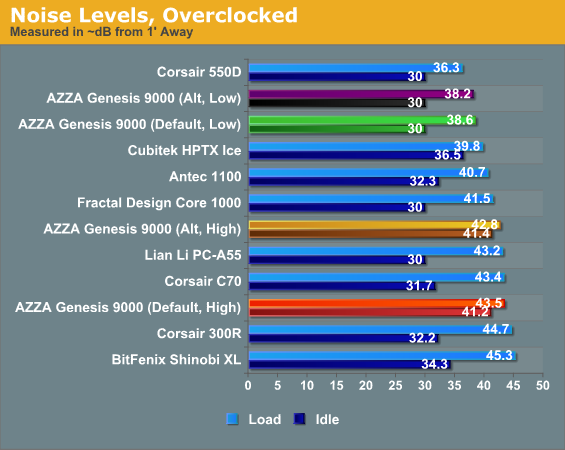
Thermals remain completely at odds with fan speeds, though; bumping up to the high fan speed nets you a bit more performance than it did under our stock thermal loads but not enough to justify the massive difference in noise. The fans actually completely drown out the Cooler Master Hyper 212 Evo we're using to cool the CPU, and the ASUS GeForce GTX 560 Ti's DirectCU II cooler is audible primarily by pitch (after about 52% the fans pick up an irritating whirr.)
Of course, since the fan speed can actually be easily toggled just by pushing a button on the top of the case, there's no reason why the end user couldn't just leave them running at low speed during non-intensive use and then run them at high speed when the system is being heavily stressed.
Conclusion: Good Value, Difficult to Evaluate
It probably makes little sense to suggest a case is both a good value and difficult to evaluate, since one leads into the other. Yet from a purely monetary perspective, AZZA really offers you a heck of a lot with the Genesis 9000. When I unboxed it and began tinkering with it, I didn't yet know just how much it was going to retail for, and I was expecting at least the low $200s. $169 is still a lot of money for an enclosure, but compare it to what else is available and it starts to look a lot more promising. In that ballpark you're looking at Corsair's Obsidian 650D, NZXT's Switch 810, SilverStone's Raven RV-02 and RV-03, and Cooler Master's HAF 932 and X. While I can't speak to the popular Cooler Master entries, I can tell you with certainty that in terms of pure performance and flexibility, I would easily take the Genesis 9000 over the other cases barring maybe the RV-02.
Part of the problem with evaluating the Genesis 9000, though, is that it's such a flexible enclosure and capable of so many different cooling configurations that it's impossible to gauge just what's going to be ideal for it. A standardized testbed can already be fairly shaky to begin with (something I discussed with Corsair's engineers recently), as even just the style of coolers used on the CPU and GPU can radically affect their performance in conjunction with the type of airflow the case employs. SilverStone's FT02, for example, might struggle more with a typical radial cooler on a graphics card, but it works like gangbusters on blower-style coolers. Yet the FT02 and most cases don't feature this much in the way of configurability.
.jpg)
What I can say with relative certainty is that the Genesis 9000 provides decent performance in its default configuration, competitive performance with the motherboard switched to the standard ATX configuration, and has additional cooling potential waiting to be unlocked by the intrepid end user willing to take the time to experiment with it (as well as invest in one or two additional fans). It's easy enough to build in on its own, but can potentially turn into a medium-term project in a hurry.
I can't unilaterally recommend the Genesis 9000, especially with the minor interior damage incurred to the front power supply cover just by removing it. Someone who wants to build it and forget it is going to be better served by an enclosure that has a much clearer design path. Yet the end user who's either interested in watercooling or just wants something to play with is liable to find a lot to like with the Genesis 9000. AZZA did a bang up job with the Genesis 9000 and priced it competitively. If you want a case that performs well and has a lot of room for customization, the Genesis 9000 absolutely gets my recommendation.

_thumb.jpg)
_thumb.jpg)
_thumb.jpg)
_thumb.jpg)
_thumb.jpg)
_thumb.jpg)
_thumb.jpg)
_thumb.jpg)
_thumb.jpg)
_thumb.jpg)
_thumb.jpg)
_thumb.jpg)


